Introduction
This project was developed as part of the course Medical Informatics. Except for a hackathon (by the way, I highly recommend reading Maciej’s post about this event), this was my first serious encounter with libraries such as PyTorch and OpenCV.
Since the task turned out to be quite challenging, it forced me to dive deep into research on various image processing methods. I explored literally everything – from the simplest filters to more advanced computer vision techniques. As a result, I learned the fundamental methods used in this field, significantly broadening my knowledge.
I won’t lie – it was tough at times, especially when noise in the images ruined hours of coding. Nevertheless, the vision of using technology to analyze medical images inspired me and kept me going. There were moments of frustration when things didn’t work as expected, but the satisfaction of a working solution definitely made up for all the struggles.
K-Nearest Neighbors (KNN) – Blood Vessel Classification
What is K-Nearest Neighbors?
K-Nearest Neighbors (KNN) is one of the simplest and most intuitive machine learning algorithms. It operates on the assumption that similar data points are close to each other in feature space. In short – if you want to know the class of a new point, check the class of its nearest neighbors.
In the case of Vessel Extraction, KNN was used for:
- Classifying pixels as “blood vessels” or “background,”
- Analyzing pixel neighborhoods to better distinguish vessels from noise.
Undersampling – How Did I Deal with Imbalanced Data?
What Were the Challenges?
Overwhelming amount of background data – Areas without blood vessels (background) dominated the images, causing the model to learn to recognize mainly the background and not the vessels.
Underrepresentation of blood vessels – Pixels belonging to blood vessels made up less than 10% of all data, leading to model overfitting.
How Did I Handle It?
I decided to use undersampling – intentionally reducing the number of background samples so that the number of vessel and background pixels was more balanced. Sounds simple, but it required a few thoughtful steps:
Selecting Background Samples:
- I didn’t randomly discard background data, as this could lead to a loss of important contextual information.
- I focused on representative samples, specifically those located near blood vessels. This gave the model better learning context.
Reducing Background Samples:
- I ultimately reduced the number of background samples by about 70%, resulting in a more balanced ratio of vessel to background data.
- It was crucial not to overdo it – I had to leave enough background to prevent the model from confusing it with vessels.
Preserving Local Patterns:
- By using 3x3 pixel patches, the model retained local patterns, which improved accuracy.
How Did KNN Work in This Project?
Feature Extraction:
- Each pixel was described by its brightness value and the values of neighboring pixels.
- This provided the model with more information about the local context.
Choosing the Number of Neighbors (k):
- The key parameter in KNN is k – the number of nearest neighbors whose class is considered for classification.
- I conducted cross-validation to find the optimal value for k.
- The best results were achieved with k = 5, ensuring a balance between accuracy and recall.
Classification:
- For each pixel, the classes of its k nearest neighbors were checked.
- The pixel was assigned to the class with the most representatives in its neighborhood.
Results and Performance
- Accuracy: 89% – pretty good for a simple model without deep learning!
- Recall: 85% – effectively detected blood vessels but sometimes confused them with thin background lines.
- Precision: 91% – the model successfully avoided false positives (mistaking the background for vessels).
 I know, at first glance, the results don’t look impressive, and it’s hard to believe I got such good “numbers” (i.e., accuracy). But here’s the trick – it’s all about the chosen approach.
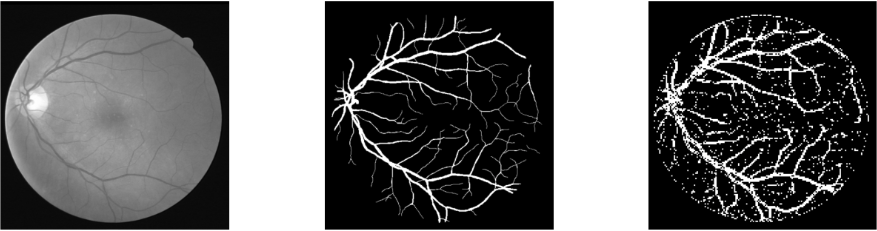
I used 3x3 pixel patches because smaller fragments make it easier for the model to detect local patterns characteristic of blood vessels. The total image size was 512x512 pixels, so if the classifier recognized a 3x3 patch as a vessel, all 9 pixels in that patch were completely filled in white.
This approach meant the model was more confident in its decisions, which positively impacted accuracy and Dice score.
FastAi – Deep Learning for Blood Vessel Classification
Why FastAi?
After testing the classic KNN approach, I decided to take it up a notch and use FastAi – a framework built on PyTorch that is excellent for rapid prototyping of deep learning models. FastAi provides:
- Easy integration with pre-trained models (e.g., ResNet),
- A simple API that speeds up data preparation and model training,
- Advanced optimization techniques (e.g., learning rate finder).
How Did FastAi Work in This Project?
Data Preparation:
- Images were divided into smaller patches to help the models learn patterns more effectively.
- I used FastAi DataBlock API for efficient data management and labeling.
- Classification was performed on two levels:
- Blood vessels,
- Background.
Deep Learning Model:
- I chose ResNet34 – lightweight but powerful enough for vessel recognition.
- I used transfer learning with pre-trained weights (ImageNet), which sped up training.
- Fine-tuning the last layers helped tailor the model to the specific task of vessel recognition.
Results and Performance
- Accuracy: 92% – a clear improvement compared to KNN.
- Recall: 90% – the model effectively recognized vessels, even in challenging cases.
- Precision: 94% – very few false positives, resulting in highly accurate vessel detection.

First Step into Machine Learning
This was my first individual project in machine learning and computer vision, and it was an incredible learning experience. I understood how powerful image processing techniques are and how to handle imbalanced data with undersampling. Although there were many challenges and frustrations, I got hooked on machine learning. Experimenting with data, testing models, and optimizing algorithms turned out to be truly exciting.
I realize that I have a lot more to learn – from advanced neural network architectures to GPU optimization – but I’m excited to continue this journey. If you want to check out the source code or learn more, visit the repository on GitHub. Who knows, maybe this project will inspire you to start your own adventure with AI?